
Hints & Tips
If
you have any questions about photography, this is a great
place to find answers!
Those on my mailing list already know that I regularly send
out Hints & Tips, to help YOU improve your own happy
snaps and reveal some of the hidden features in your
camera.
If you have any questions you'd like to ask me directly,
simply join my
facebook page.
Happy Snapping,
André Agnew
If you'd like to receive the free newsletter, simply
contact me.
To view our Facebook page, with discounts and other
offers,
click here.
====================
Hints & Tips #001: Computer Monitor
Colours
After
good composition and exposure, the big ticket item for any
photographer is 'colour'.
Many computers are incorrectly set-up in terms of Tone and
Colour.
We want you to see our images as they were intended...
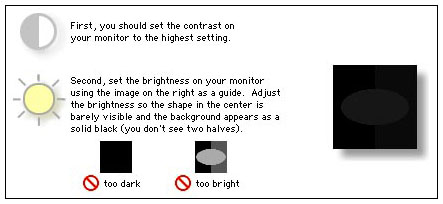
TONE:
Do you see 0-100 from pure white to pure black with breaks?
The break line between 95 to 100 should be barely seen. If
not, adjust your screen contrast &
brightness.
COLOUR:

Do you see smooth RGB spectrums without any breaks?:
If you see breaks, you are not viewing with the maximum
colours available.
CONTRAST
AND BRIGHTNESS*:
*Copyright © 2007 Apple Inc.
====================
Hints & Tips #002: Using Your Flash
Outdoors
Often
when photographing outdoors, harsh shadows will obscure the
faces of your friends and family.
Here’s a simple tip - turn on your flash when shooting
outdoors. The flash will help fill these dark areas of the
face.
Try it next time to see the difference, once with the
flash, and once without. You’ll be amazed at the
difference!
====================
Hints & Tips #003: Night Time
Photography
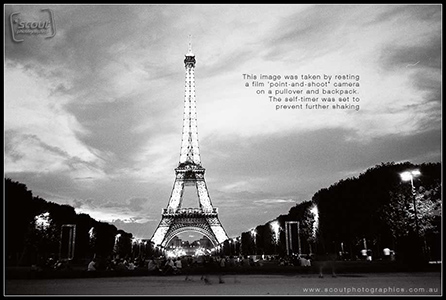
Often
when shooting in poor light, your images may appear well
exposed, but blurry. This is a common phenomenon when using
‘point-and-shoot’ cameras.
To overcome this problem, it is not always necessary to
resort to a tripod!
Simply rest/push the camera against a wall, pole or any
other hard surface, to help you keep the camera steady
during the shot.
You can also place the camera on a table using a jumper,
wallet, or other soft items as support. Using such readily
available props will help point the camera more accurately
into the desired direction (and keep keep it there!).
Be sure to use the self-timer on your camera, to prevent
the camera from moving while you press the button (“shutter
release”).
====================
Hints & Tips #004: Photographing
Kids
When
photographing your children, nieces, nephews, brothers and
sisters, the key thing to remember is - “the only thing
predictable, is their unpredictability”.
Needless to say, a camera with a fast shutter response is a
great investment for such photography – as any delay
between pressing the shutter, and the photograph being
taken, will likely ensure that the moment will be missed
forever.
A frustration many people face is that they miss that
perfect shot...This is not always due to a camera with a
poor reaction or start-up time, but also the result of
putting the camera down too early. Persist a little...stand
back with your camera in hand, and allow them to be
themselves.
Children rarely have the patience to pose. Forcing this
upon them often makes for uncomfortable looking
photographs.
Try kneeling down and photograph them from a lower height.
Rarely are children photographed from their own eye
level... This approach provides great results, often
exposing their personality far greater than photographs
taken from an adult (taller) perspective.
Most of all – have fun with your kids, let them handle your
camera so that they can feel more comfortable in its
presence, and let them be themselves while you’re capturing
their childhood moments.
====================
Hints & Tips #005: Buying a
Point-and-Shoot Camera
I have
been approached by many with questions of what to look for
when buying a point and shoot camera. So, here are some
tips:
- Disregard the number of “Mega Pixels”. The difference
between, say a 6MP camera and an 8MP is relatively
unimportant, when it comes to image quality and how large
you can print your images. I have a gorgeous A2 size (60cm
x 42cm) print hanging in my living room, taken with a 6MP
camera. What’s really important is the quality of the
pixels, not the quantity.
- Once you have a price range in mind, look for cameras
with the smaller sensor sizes in that range (I recommend no
more than 6 Mega Pixels). Chances are the models in your
sights now have better lenses (VERY important) and most
likely more features.
- Things to look for in a lens are whether it is
manufactured from plastic or glass, and also the numeric
values on the lens (you will see a number preceded with the
letter “f”). A small “f” number (called an “f-stop”) like
1.8 or 2.8 will mean that you’ll be able to take images in
darker settings, with less blur, than a lens that has a
larger “f” number like 4.8 or 5.6. That is to say, a lens
with a smaller f-stop it will be much better indoors or on
overcast days.
- Having a 6MP camera, as opposed to a 8MP camera also
means that you’ll be able to store more images on your
card, and that you’ll be able to process them faster on
your computer (and not clog up your hard drive).
- Finally, try to find a camera that uses commonly
available batteries, like “AA”. This will mean you’ll never
get caught out with flat batteries, as AA’s are readily
available. Needless to say, invest in rechargeable
batteries, to save money and the environment. A charger
that takes longer to recharge your batteries is also the
way to go, as these are gentler on your batteries – giving
you more recharges.
====================
Hints & Tips #006: What's this EV
Button on my Camera?
Your
digital camera probably does a fine job at giving you well
exposed images. That is to say, they’re not too dark or too
bright. However, in some circumstances, the camera may find
it hard to get your subject perfectly exposed, rendering it
too dark or too bright.
For example, you may be shooting a friend standing in a
field of snow, or shooting someone with the sun or other
bright background behind them. In these instances, your
friend will likely become nothing more than a silhouette in
the resulting photograph. To overcome this problem, simply
set your EV value to +1/2 or +1, maybe more if
needed....You’ll have to experiment a little at the time to
get it just right - as each circumstance is different.
Conversely, if you are finding that your main subject is
too bright in the photograph, simply turn down the EV value
into the negative range.
====================
Hints & Tips #007: Landscape
Photography
When
shooting landscape photography it is important to realise
that our eyes and mind see a scene very differently to the
way in which a camera does.
Our brain does much processing when we look out at a large
scene. Our eyes scan across the landscape, constantly
readjusting focus and varying the amount of light we see.
Our brain takes this multitude of data and combines it into
one coherent picture. A camera, no matter how advanced, can
only take one image at one setting.
For this reason, landscape photography can be one of the
most challenging and demanding fields of photography. But
for the average point-and-shooter, there are some basic
things to keep in mind:
- Try to place a subject of interest in the foreground (a
rock, tree, cabin - anything) if you find the image lacking
“Pow”. As pretty as wide open space, clear ocean and
beautiful sunset may appear to us – scenes with little
“points of interest” can feel flat and lifeless in print.
- Having said this, try to find something in the mid-ground
and background too – this will help provide a sense of
“depth”.
- Choose an appropriate time of day. I find shooting in the
morning or late in the day offers best results. The low
shadows cast by the sun can make for very interesting
images.
- Use a tripod. This will help make your image nice and
sharp - depending on your lens, of course
(not your sensor).
- To get a soft, blurry effect when shooting water – slow
down your shutter speed (many point-and-shoot units will
let you do this)...Be sure to use a tripod!
- Most importantly – walk around and enjoy the landscape.
Changing your location can provide far more interesting
perspectives on a scene than your initial location. .
====================
Hints & Tips #008: Post-Processing
Your Photos at Home
The
ease of access to software such as “PhotoShop”, “Paint
Shop” “iPhoto” or “Google’s Picasa” means more and more
people are post-processing (not to be confused with
“editing”*) their images themselves.
Although many know how to use the tools, filters and other
elements of such software packages, an often neglected
aspect of the process is the type of file being
manipulated. As such, most people process and save their
files in JPEG format.
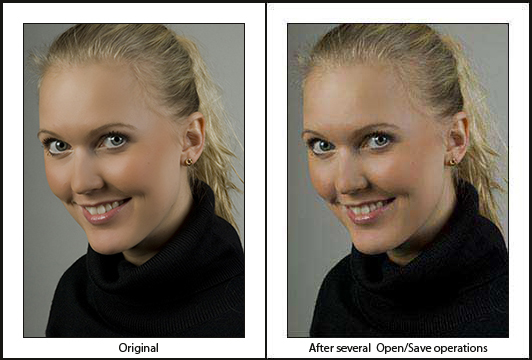
It is important to remember that a JPEG is a “lossy” file.
This means that each time the file is “played with” and
saved, data is automatically discarded. After repeated
“opening & saving” the file becomes pixelated and will
lose lost much of its original colour & richness:
It’s important to select the
right file format for your job. If you’re processing an
image in order to print it and hang in your home, you’ll
need to take a different approach compared to when you’re
processing an image merely for uploading to your Blog.
As always, if you have any questions at all – feel free to
contact me via email any time. .
====================